Learning how to check token liquidity before buying is more useful than asking whether a token is simply “liquid.”
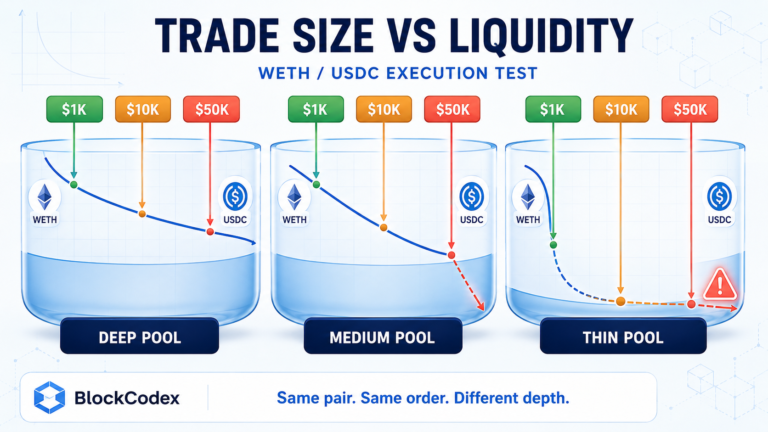
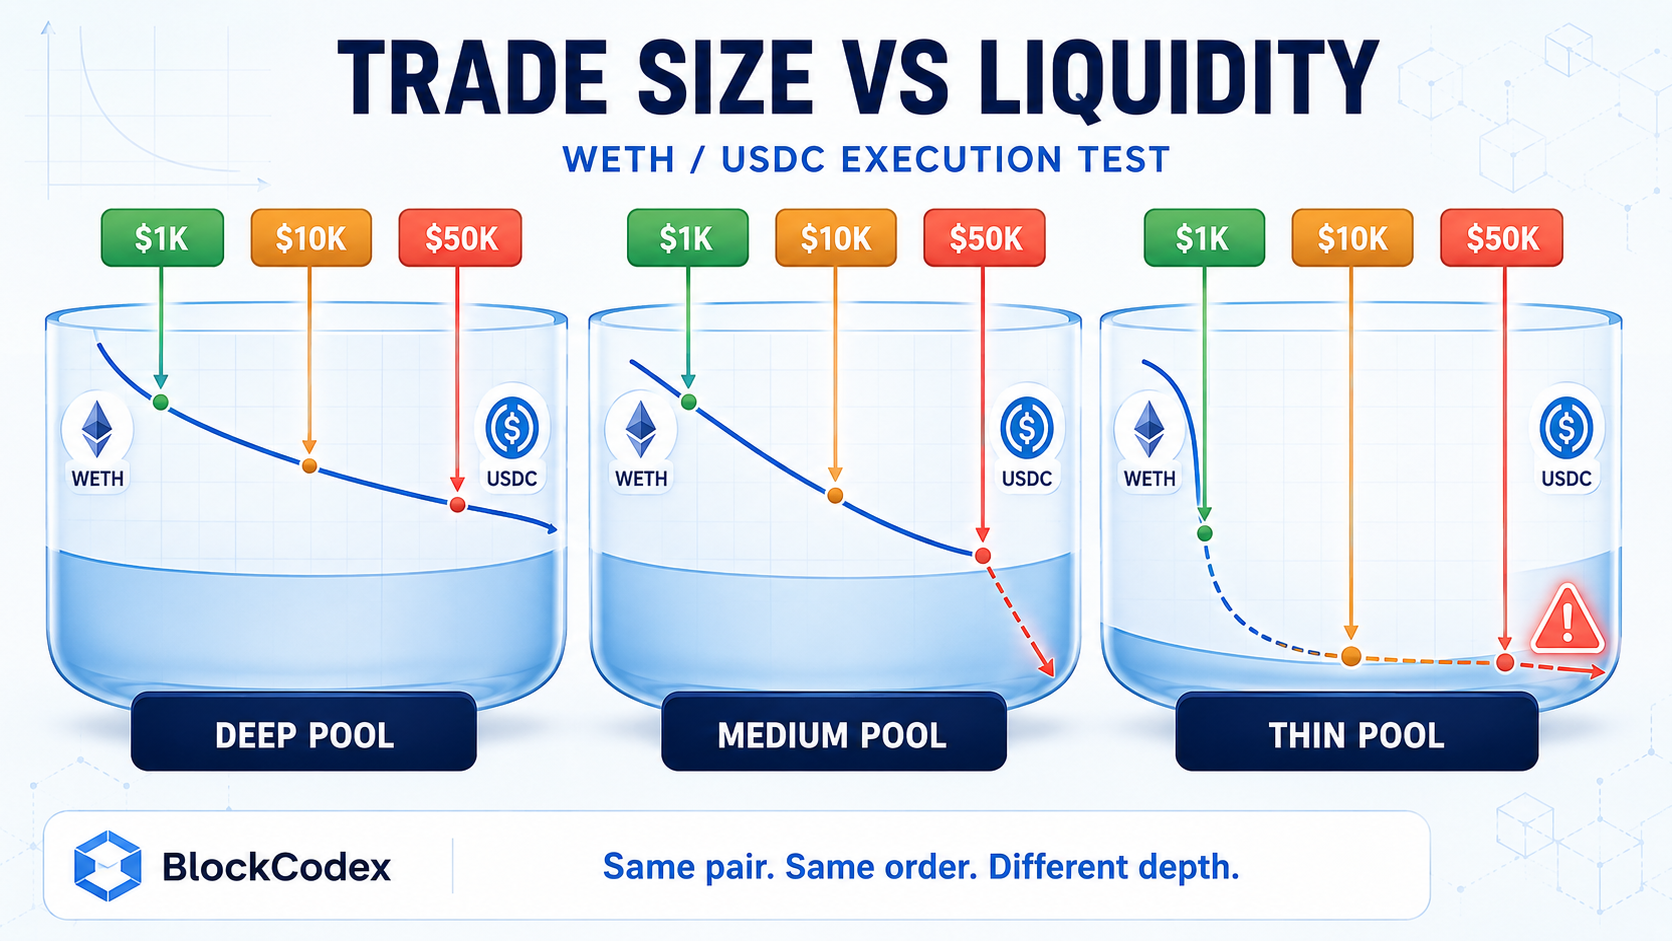
Liquidity is relative to the trade you want to make. A pool that handles a $500 swap comfortably may produce noticeably worse execution for $25,000, while a token with millions of dollars in reported liquidity can still route poorly if that capital is fragmented across pools, fee tiers or price ranges.
The practical test therefore starts with your intended order, not the token’s market cap or 24-hour volume.
Before buying on a DEX, you want to know whether enough usable liquidity exists along the actual trading route to execute your position at an acceptable price — and whether you are likely to have a reasonable exit later.
How to Check Token Liquidity Before Buying: The Five Numbers That Matter
A DEX liquidity check does not require dozens of indicators.
For most trades, start with five things:
| Check | What It Tells You |
|---|---|
| Pool liquidity | How much capital is associated with the pool |
| Token reserves / active liquidity | What actually supports swaps |
| Intended trade size | How much pressure your order creates |
| Price impact | How much your own trade changes the quote |
| Route and slippage | How the trade will execute and how much deterioration you allow |
The mistake is evaluating these independently.
A $5 million pool sounds deep until the intended position is $500,000. A $200,000 pool may be perfectly usable for a $300 trade. A token with several pools may offer better execution through an aggregator than through the first pool you find.
Liquidity becomes meaningful only after a trade size is attached to it.
Step 1: Verify the Exact Token and Network
Before evaluating liquidity, verify what you are actually buying.
Crypto tokens can share names and tickers, and the same asset may exist across several networks. Search by contract address rather than relying only on a ticker such as UNI, PEPE or USDC.
Then confirm the network.
Liquidity on Ethereum does not help a swap occurring on Base unless your trading route includes a bridge or another mechanism connecting the two environments. The same token can have deep liquidity on one network and extremely weak liquidity on another.
This means a proper liquidity check should always identify:
Token contract
Network
DEX
Trading pair
Pool or fee tier
Without those details, a statement such as “this token has $10 million of liquidity” is incomplete.
Step 2: Look at the Pool, Not Only the Token
Tokens do not have one universal pool of liquidity.
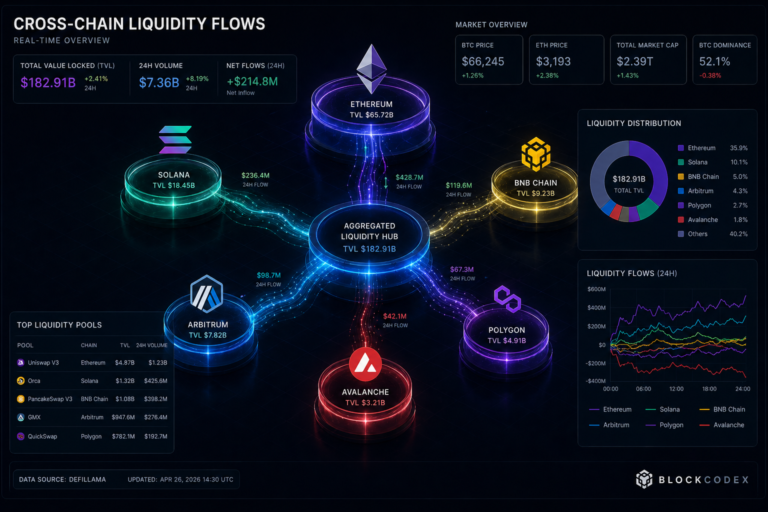
A token may trade against WETH in one pool, USDC in another, USDT elsewhere and several other assets across multiple versions of the same DEX.
That fragmentation matters because each pool can produce different execution.
Suppose a token has $20 million of liquidity across its entire market, but the pool your wallet is about to use contains only $400,000. The larger aggregate number does not absorb your transaction.
Your order interacts with the liquidity available along its route.
This is the same distinction explored in BlockCodex’s guide to market depth in crypto: liquidity belongs to a specific market and execution venue, not to a token in the abstract.
Step 3: Inspect the Pool Reserves
For a traditional constant-product AMM, pool reserves provide a direct picture of the assets available on each side.
Consider a UNI/WETH pool.
If it contains roughly equal dollar values of UNI and WETH, a buyer sending WETH into the pool receives UNI out of it. As the trade becomes larger relative to the reserves, the pool balance changes more aggressively and the execution price moves further away from the starting price.
This is why the total liquidity figure should never be the end of the analysis.
Inspect the actual assets supporting the pool.
A pool may show substantial dollar liquidity because one asset has risen sharply. Another pool may contain large token quantities but relatively little value on the side you need for your intended trade.
What matters is whether the pool can absorb your order without forcing the pricing curve too far against you.
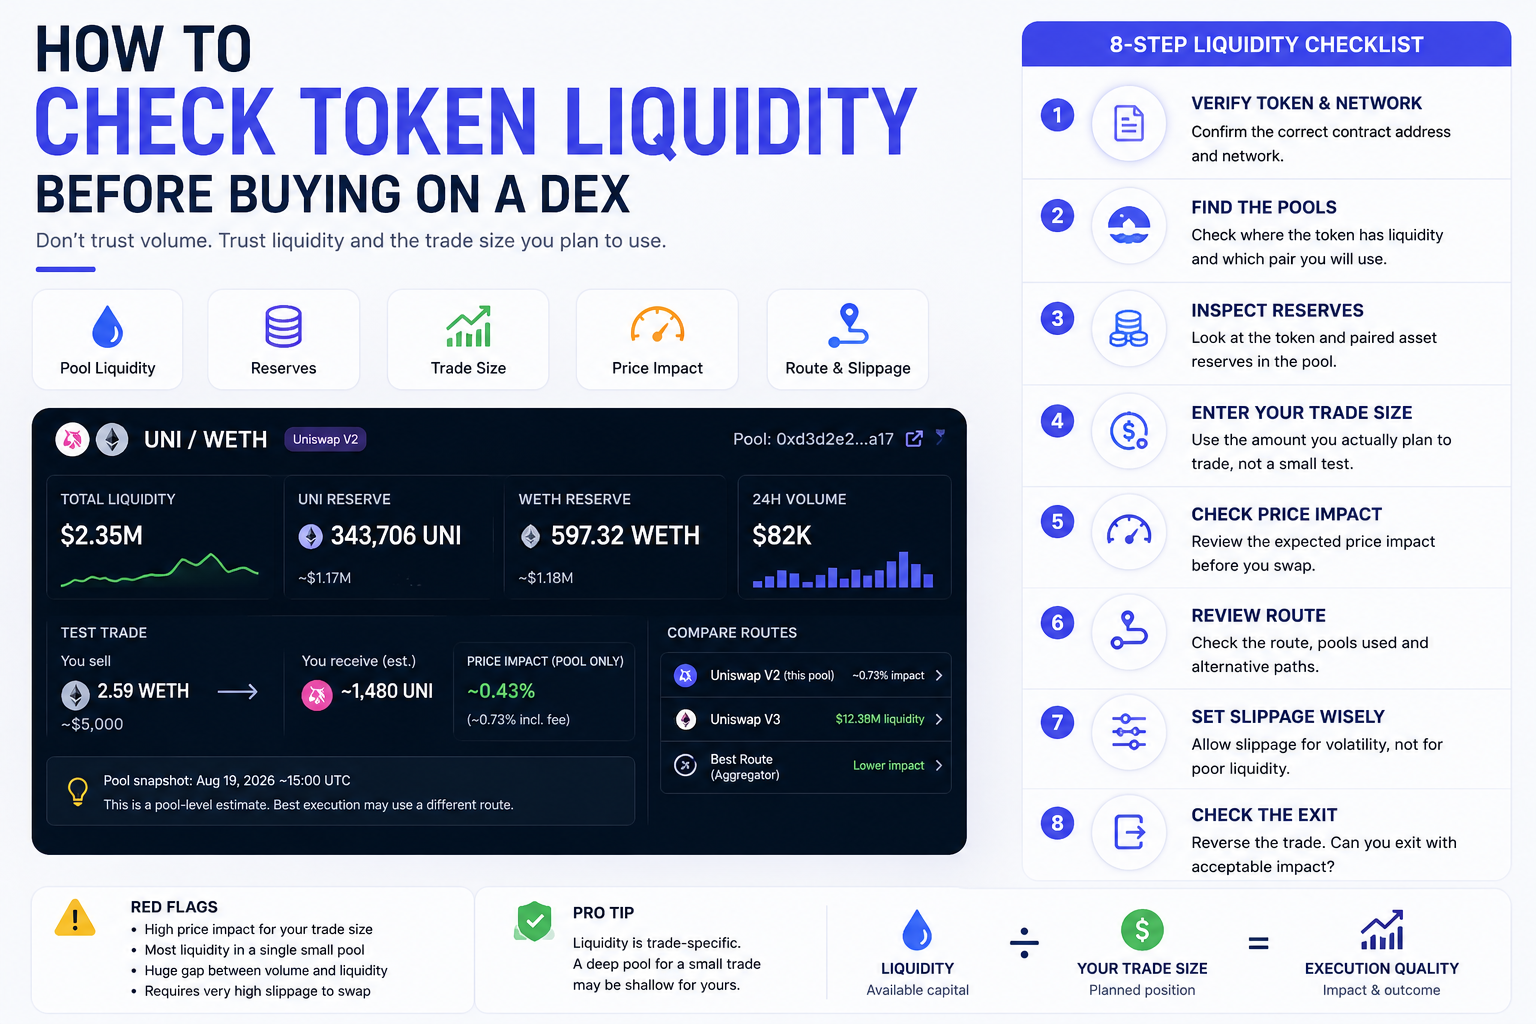
BlockCodex Live Check: UNI/WETH Before a $5,000 Buy
To make the process concrete, BlockCodex checked a live Ethereum liquidity pool on August 19, 2026 at approximately 15:00 UTC.
The pool selected was the UNI/WETH Uniswap V2 pair.
At the time of the check:
| Metric | Snapshot |
| DEX | Uniswap V2 |
| Pair | UNI/WETH |
| Pool address | 0xd3d2e2692501a5c9ca623199d38826e513033a17 |
| Total liquidity | ~$2.35 million |
| UNI reserve | ~343,706 UNI |
| WETH reserve | ~597.32 WETH |
| 24h volume | ~$82,000 |
| Test trade | ~2.59 WETH into UNI |
| Approximate trade value | ~$5,000 |
At first glance, $2.35 million of liquidity compared with a $5,000 trade looks comfortable.
But the useful question is not whether $2.35 million sounds large.
It is what happens to the quote when 2.59 WETH actually enters the pool.
A Pool-Only Execution Estimate
Uniswap V2 uses a constant-product pricing mechanism, so the reserve balances can be used to estimate how much UNI a direct trade would receive before considering any alternative router.
Using the observed reserves and the pool’s 0.30% swap fee, a 2.59 WETH input produces an estimated output of roughly 1,480 UNI in a simplified direct-pool calculation.
The pool-curve effect alone is approximately 0.43% relative to the post-fee spot calculation. Including the swap fee, the difference from the initial reserve-ratio price is closer to roughly 0.73%.
That is not a live Uniswap router quote.
It is deliberately a pool-level estimate.
The distinction matters because the Uniswap interface may discover a better route through another pool or protocol version. At the same snapshot, a UNI/WETH Uniswap V3 pool showed substantially more liquidity than the V2 pool.
So even though the V2 pool can absorb this example order reasonably well, it does not automatically follow that it is the best place to execute it.
This is why the next step is routing.
Step 4: Enter Your Actual Trade Size Before Judging Liquidity
One of the most useful liquidity tools is already built into a DEX swap interface.
Enter the amount you genuinely intend to trade.
Do not test $100 and assume the result scales cleanly to $10,000.
If you intend to buy $5,000 of a token, inspect a $5,000 quote. If your planned position is $25,000, use $25,000.
As trade size increases relative to available liquidity, price impact generally becomes less favorable. The relationship is not linear, which means doubling your trade does not necessarily just double the execution cost.
This is why slippage in crypto should be treated as an execution problem rather than a generic setting you configure once and forget.
Your planned position must fit the market that actually exists.
Step 5: Check Price Impact Before You Check Slippage Tolerance
Price impact and slippage are related but different.
Price impact measures how much your own transaction changes the price available through the liquidity being consumed.
Slippage describes how much the actual execution may differ from the quoted outcome as conditions change between quotation and execution.
If the swap already shows substantial price impact before you submit it, increasing the slippage tolerance does not solve the underlying liquidity problem.
It simply allows the transaction to execute across a wider range of outcomes.
That distinction is essential.
A token requiring a very high slippage setting may be telling you that execution conditions are poor, the market is volatile, the token has transfer mechanics affecting the swap, or liquidity is insufficient for your order.
Treating the slippage setting as a button that makes a bad trade work is the wrong approach.
Step 6: Inspect the Route
Modern DEX interfaces and aggregators may route a transaction through more than one pool.
A UNI purchase might theoretically execute directly through UNI/WETH, through another fee tier, through a different Uniswap version, or through a multi-hop route if that produces a better result.
The route therefore deserves inspection.
On Uniswap, expand the swap details and look at the order routing rather than assuming the most obvious token pair is being used.
This matters because liquidity can be fragmented.
The live UNI example illustrates the point clearly. The V2 UNI/WETH pool held roughly $2.35 million of liquidity at our snapshot, while another UNI/WETH pool on Uniswap V3 showed considerably more.
A trader looking only at the V2 pool would therefore be analyzing only part of the available market.
The best route is the one that gives the intended trade the best execution, not necessarily the pool with the most familiar address or the highest headline volume.
Step 7: Check Whether Liquidity Is Concentrated
Pool structure matters too.
Uniswap V2 spreads liquidity across the entire pricing curve. Uniswap V3 and V4 allow liquidity providers to concentrate capital within selected price ranges.
Concentrated liquidity can make execution extremely efficient around the current price because more capital can be positioned where trading actually occurs.
But it introduces another question:
Where is the liquidity?
A pool can report large total liquidity while only part of that capital is active near the current price. If price moves beyond heavily funded ranges, available depth can change quickly.
This means headline liquidity should not be treated as equivalent to usable liquidity.
For V3 or V4 pools, the quoted output for your actual trade becomes especially valuable because it reflects the liquidity available along the execution path rather than just the pool’s total value.
Step 8: Compare Liquidity With 24-Hour Volume
Volume is useful context, but it is not a substitute for liquidity.
The live UNI/WETH V2 snapshot provides a good example.
The pool had approximately $2.35 million in liquidity but only about $82,000 of reported 24-hour trading volume at the time of the check.
Those figures measure different things.
Liquidity describes capital available to facilitate transactions.
Volume describes trading that already occurred.
A pool can have high liquidity and relatively low recent volume. Another can generate high turnover with much thinner available liquidity.
Neither number tells you execution quality on its own.
The actual quote for your intended position is more useful.
Step 9: Check the Exit Before You Enter
Most buyers inspect only the purchase.
That is incomplete liquidity analysis.
Before buying a token, reverse the direction mentally and ask what would happen if you needed to sell the entire position later.
Could the same pool absorb the exit?
Would you still have access to the same route?
Is most liquidity dependent on one venue?
Could liquidity providers withdraw?
Could a sharp price move push concentrated liquidity out of range?
This becomes especially important for smaller tokens.
Buying into a rising market can be surprisingly easy because demand and liquidity are temporarily concentrated around the same direction. Selling during stress can be very different.
BlockCodex’s analysis of DeFi liquidity risk explains why liquidity should be evaluated when participants want to leave, not only when conditions are calm.
A good entry without a credible exit is not good liquidity.
Red Flags Before Buying a Token on a DEX
Several conditions should make you slow down before executing.
A trade that is small relative to your portfolio but large relative to the pool deserves attention. So does a quote showing significant price impact before the transaction is even submitted.
Other warning signs include most liquidity sitting in one small pool, a very large gap between reported market volume and usable DEX depth, dependence on an unfamiliar route, or the need to increase slippage dramatically just to make the transaction go through.
Liquidity that disappears when you increase the trade size is particularly revealing.
The token may be tradable.
That does not mean it is tradable at the size you need.
A Five-Minute DEX Liquidity Check
A practical pre-buy routine can remain short.
Start with the contract address and confirm the network. Find the main pools and identify where the token actually trades.
Inspect the liquidity and token reserves, then enter your intended order size in the DEX rather than testing an unrealistically small transaction.
Open the swap details.
Check the expected output, price impact, route and maximum slippage.
Then change the trade direction and think about your eventual exit.
Finally, compare the selected pool with alternative pools or fee tiers. If another venue holds substantially more usable liquidity, understand why your router selected — or did not select — it.
You should be able to summarize the result in one sentence.
For example:
“The token has enough liquidity for my planned $2,000 entry with limited quoted impact, but liquidity is concentrated in one venue and the exit becomes noticeably worse at larger sizes.”
That is much more useful than saying:
“The token has good liquidity.”
Liquidity Is a Trade-Specific Question
There is no universal dollar figure that separates a liquid token from an illiquid one.
A $1 million pool can be enormous for a $100 purchase and dangerously small for a six-figure position.
This is why crypto market depth should always be evaluated relative to the investor’s actual size.
The same logic also prevents a common mistake with high-market-cap tokens. A large market capitalization does not guarantee that every DEX pair is deep.
Market cap measures asset valuation.
Volume measures past trading activity.
Pool liquidity measures capital committed to facilitating trades.
Price impact shows what your own transaction does to the available execution.
Those are related metrics, but they answer different questions.
Final Thoughts
Knowing how to check token liquidity before buying means moving from headline numbers to executable liquidity.
Start with the exact token, network and pool. Inspect the reserves and identify where liquidity is actually located. Then test the position size you intend to trade rather than an arbitrary small quote.
Price impact tells you whether your order fits the available liquidity. Routing tells you which pools are actually being used. Slippage defines how much deterioration you are willing to accept after the quote. Concentration tells you whether the headline liquidity remains useful as price moves.
The live UNI/WETH example illustrates why all of those layers matter. A $2.35 million V2 pool looked comfortably larger than a $5,000 test trade, and the pool-level calculation suggested manageable impact. But a larger UNI/WETH V3 pool existed at the same time, meaning the V2 pool alone did not represent the full execution environment.
That is the core lesson.
Do not ask whether the token has liquidity.
Ask whether enough usable liquidity exists for your trade, through the route you will actually use, at the moment you intend to execute it.